Transfer a Spring image on a book stack for an inexpensive and simple Spring home accent piece. This is perfect for your french cottage home!

Hi friends and happy Tuesday! I hope you enjoyed your weekend. It was so nice here in Dallas, Texas, and it really felt like Spring. Did you see my French Cottage Spring Home Tour? Click on over for pictures and a little video walk through!
I have a few more DIY Spring decor ideas to share with you in the next week that I think you’ll enjoy. Including the book stack DIY that I am sharing today!
Yall! These turned out SO cute! Just imagine all of the ways you can customize these book stacks for the different seasons! Yall already know I LOVE decorating with books, and this is such a fun way to add a seasonal touch to your decor. And it just happens to be very inexpensive and simple to do! Of course I used bunnies, tulips, and bird nests on my Spring book stacks!
How to Add An Image on Book Stack
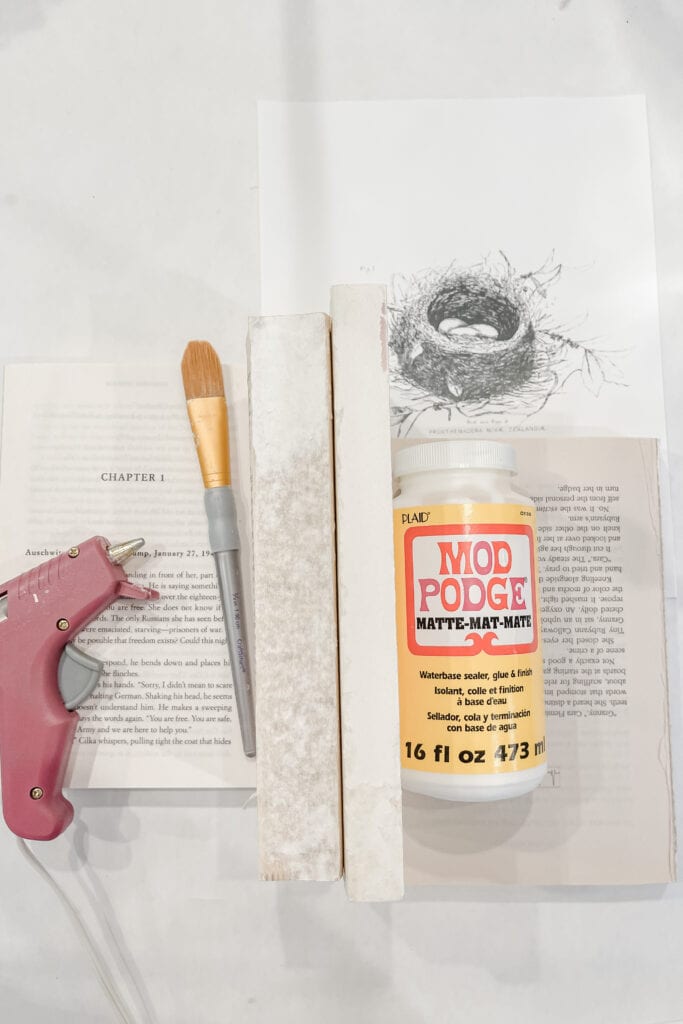
You need a few items to create these cute book stacks, and you probably already have most of it on hand.
- Books
- Mod Podge
- Images printed with a laser printer
- X-acto Knife
- Ribbon or twine for embellishing
There are so many options when you’re looking for images to add to the spine of your books! You could do anything seasonal, or you could even do a family photo.
For my book stacks, I stuck to Spring images. I googled images for vintage rabbits, bird nests, and tulips which are all of my favorite elements to decorate with for Spring. The graphics I used were mostly black and white, but I’d love to edit the color to some brown and grey tones or even pastels on a few next time…I think that would be really pretty!
I ended up using both horizontal and vertical images, so I could sit my books flat and have some standing upright….and they both turned out SO cute!
Wouldn’t these also make such a sweet gift?!
Image On Book Stack
How-to Video
Image Transfer Books in 3 Steps
Step One:
Remove the front and back covers off of your paperback books. Hot glue the books together to secure them in place. When you apply the hot glue next to the spine, keep it about 1/2″ away from the edge so you can still easily trim in between the books. Wrap the book stack with string or twine if you need extra support to keep them steady while you apply the mod podge.

Step Two:
Apply a thin coat of Mod Podge to the book spines, then press your image onto the spines. I like to smooth down the mod podge using another piece of paper. This way it glides across the paper smoothly.


Step Three:
Once the mod podge is very dry, trim off the excess paper using an X-acto knife. (You want to make sure the paper is very dry or it will tear instead of creating a nice clean cut when you use the X-acto knife.) Use the X-acto knife to cut in between each book to separate the spines. Once trimmed, add a final coat of Mod Podge.


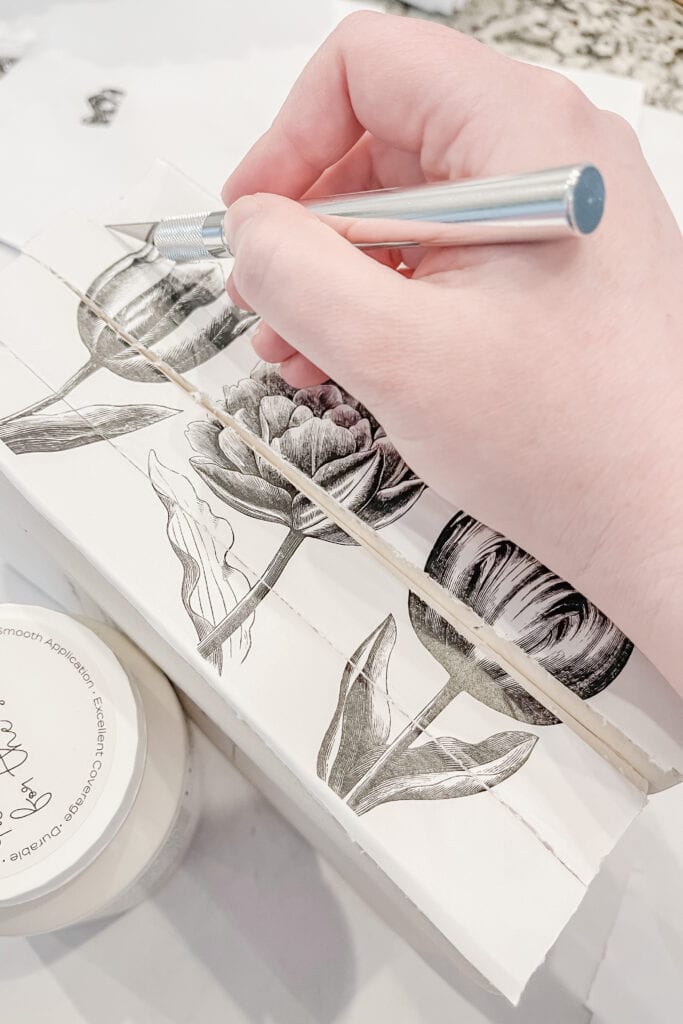
That’s all there is to it! It’s pretty simple isn’t it? Once the final coat of mod podge is good and dry, try adding a ribbon or twine around the book stack to complete the look. You could even tuck a faux flower under the ribbon to tie it all together.
FAQ Decoupage Image Transfers
Can I use an inkjet printer?
In short, the ink will more than likely smear on you and you won’t end up with a nice crisp image.
Can I use a color photo or does it have to be black and white?
Yes, you can use a color image as long as it has been printed using a laser printer.
Where do I find images to use?
If you don’t plan on selling your book stacks, you can use any images you find online! If you plan to sell them, you need to make sure your image is in public domain and not under copyright. I simply googled vintage rabbit image, vintage tulip drawing, etc to find my images. I sized them small enough that I could use them on most of my books. I’ve linked the graphics here for you to print! *Please know these images are for personal use only.
Image On Book Stack Ideas


What do you think about these image transfer books?! I might be partial to the tulips and bird nests but I just love how they all turned out! I’m excited to do a few more for Fall and Christmas. I might even have to do one of the twins newborn photos on a book stack to put in our bedroom. Wouldn’t that be sweet?
Image On Book Stack
Pin It For Later

I’d love for you to say hello down below and let me know what you think! And if we’re not friends over on Facebook or Instagram, what are you waiting for?! ☺️
Are you on Pinterest? Come follow along for more French cottage inspiration!
Blessings,
Kayla C.





These are super cute. Perfect for spring.
Hi Dorothy! So glad you love them too! Thanks for taking the time to read and comment! 🙂
Hi Kayla, I\’m a new subscriber. I love these! Did you do a stack with the nest? If so, can you add a photo? Thanks!
Hi Marilyn, welcome! I’m so glad you’re here! Yes I did do the bird nest and I’ve gone in and added two pictures for you. Hope this helps!
I love this soooooo much! Thank you for the images! I can’t wait to make this. Beautiful job on this project.❤️❤️❤️
Hi Leslie! Oh I’m so glad you love it! Thank you so much friend!
I recently started following you on Instagram. I love this idea, so clever! I have just glued the bird’s nest on the books and am waiting for it to dry. Have you tried brushing the Modge Podge over the top of the image, or is that not necessarily a good idea? Thanks in advance for sharing your opinion.
Hi Penny! Welcome friend! So glad you love this project too. Yes, I did add a layer of matte Mod Podge on the top!
Wow! These are beautiful and amazing! I can hardly wait to try it! Thanks for sharing.
Hi Bobbi! Oh I’m so glad you love them too! Thanks for stopping by! – Kayla
Hi Kayla—Thank you so much for the great images to use on the book stacks! I made one using the bird’s nest and it turned out fantastic. I have an Ink Jet printer and I’m able to stop the images from smearing if I first spray them with a Workable Fixative. I print the images on plain printer paper, then spray them twice, making sure the 1st layer is dry. (the spray dries quickly) Be sure to work outside for this step b/c the fumes are quite strong. I’ve enjoyed reading all of your posts and finding some great diy projects to try out. Thanks again, Kayla!
Hi Mary! Oh wow, what a great tip! Thank you so much for sharing this, I had no idea about it! So glad you’re enjoying the blog. I really appreciate you being here and for taking the time to comment!